
testing KVM disk limits

In this post, I am testing the IO limits for disks provided by KVM. Why should you configure the disk limits in your guests? If you have your KVM disks in a shared storage back-end, as I have, and you cannot control the operations inside your VPS, you should establish some limits for each disk. You should monitor your VPS IOPS load if you don’t want to suffer an overhead in your storage caused by one VPS consuming a lot of IOPS. One VPS can saturate the storage degrading too much the performance of the rest of VPS. This can be, because your VPS are administered by very different people/customers or because you don’t want that an operation you perform in one VPS (that needs high IOPS) can cause IOWAIT to other VPS.

I am using ISCSI with 10 SAS drives configured as RAID10 for my back-end storage. In this test I configured in the virtio disk 200 IOPS and 10MBs for max bandwidth.

The first tool I used to test the limits is hdparm inside the VPS. With hdparm I tested the max bandwidth I could get from the storage, because this tool performs a sequential access. Without the limits I got 156MB and with the disk limited I got the expected 10MB.

hdparm with no limits on the disk:

# hdparm -t /dev/vda

/dev/vda:
 Timing buffered disk reads: 472 MB in  3.02 seconds = 156.36 MB/sec

hdparm with the disk limited to 10MBs:

# hdparm -t /dev/vda

/dev/vda:
Timing buffered disk reads: 32 MB in 3.02 seconds = 10.61 MB/sec

We can verify that the limits are perfectly applied. I used another tool, iometer, to verify the limits, because iometer has many configuration options to test them. To test the max bandwidth I configured a iometer test with a 256KB transfer request and 100% secuencial read access. With this iometer test I got a very similar value to hdparm with no limits on the disk:

iometer_nolimit

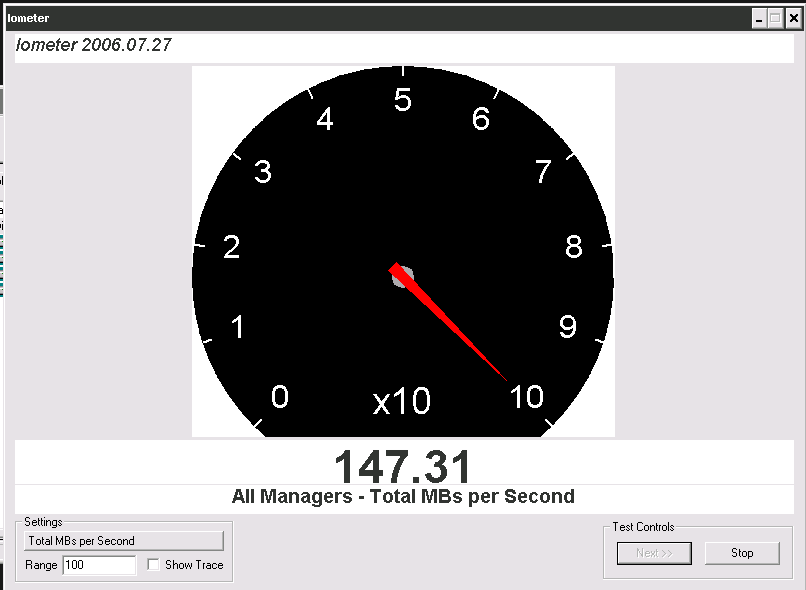
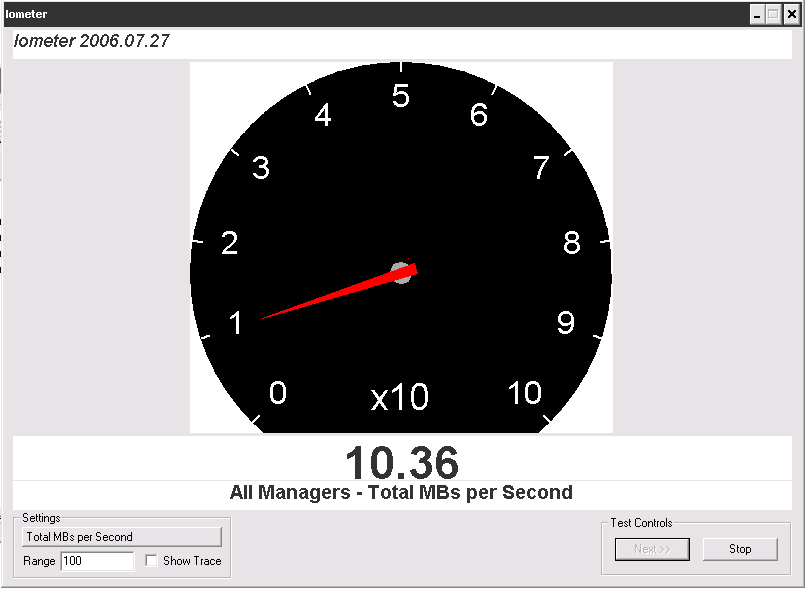
And with the disk limited to 10MBs I got again the same value:

iometer_limited

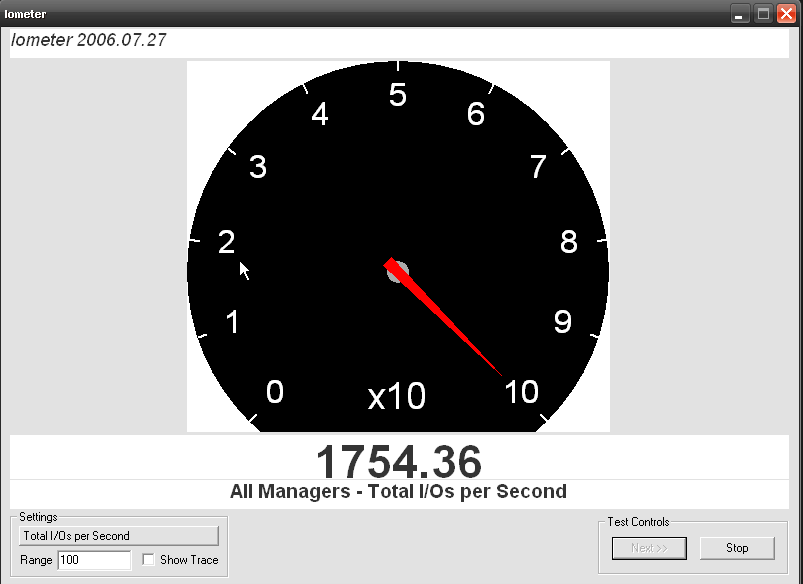
Ok, we know that the max bandwidth limits are applied perfectly well. I wanted to test too the KVM disk limited by IOPS instead of bandwidth. I configured the disk limited to 200IOPS and to test this limit I made a new iometer test, but this time with a 512B transfer rate and 100% sequential read access.

With the disk no limited and disk cache set to none I got about 1800 IOPS:

iops_nolimit

With the disk limited to 200 IOPS I got exactly 200IOPS avg:

iopslimit_limited

The IO limits are applied perfectly well for the VPS and another very important point: These limits are applied regardless of the disk cache mode used. If you use writeback cache mode, you can get many more IOPS in the guest than if you use cache mode set to none, but if you set IO limits on the disk you will get exactly the same IOPS in the guest. Ok, I use cache mode set to none for almost all VPS, so what limits should I configure to prevent abusive use of the storage?

Well, this is very dependant on the workload, but for me, the most painful IO operations I suffered, are from those that demand very sequential access, like creating a large tar.gz, making backups or the process of booting the VPS.

I want to limit the guest IOPS, but without affecting to much the performance of the guest. To archive this I configure 10MB for max bandwidth (reading and writing), 200IOPS for reading and 180IOPS for writing. After some time using these limits, I guess the VPS are hiting the bandwidth limit time to time. For example the VPS boot process lasts a bit longer, but after booting the VPS have an acceptable performance and the entire storage performance are better managed.

KVM/Openvz dumps with specific name using a hook

Vzdump is the tool used to back up virtual machines in Proxmox.
A few weeks ago, I wrote an entry describing how to do a dump with an specified name, rather than using the default naming for this backups in Creating Kvm backups with an specific name, but now, I’m comming with a much more elegant solution using a hook for vzdump. In Proxmox 2.x, you can back up machines from the web interface very easily and using a hook all is done transparently.

This tool has an option “-script” to be able to call an script during its execution.

 -script    string
	     Use specified hook script.

You can configure an script to do what ever you want in diferent states during vzdump execution. In this case, I only want to rename default file to a more representative one so I’ve only used the backup-end state to do it at the end of the dump process. My script located in /root/scripts/vzdump-hook-script.pl:

#!/usr/bin/perl -w

# example hook script for vzdump (--script option)

use strict;
use File::Copy qw(move);

my $basedir="/mnt/pve/pve-backups/dump";
print "HOOK: " . join (' ', @ARGV) . "\n";

my $phase = shift;
if ($phase eq 'backup-end' ){
    my $mode = shift; # stop/suspend/snapshot
    my $vmid = shift;
    my $vmtype = $ENV{VMTYPE} if defined ($ENV{VMTYPE}); # openvz/qemu
    my $dumpdir = $ENV{DUMPDIR} if defined ($ENV{DUMPDIR});
    my $hostname = $ENV{HOSTNAME} if defined ($ENV{HOSTNAME});
    # tarfile is only available in phase 'backup-end'
    my $tarfile = $ENV{TARFILE} if defined ($ENV{TARFILE});
    # logfile is only available in phase 'log-end'
    my $logfile = $ENV{LOGFILE} if defined ($ENV{LOGFILE});
    print "HOOK-ENV: vmtype=$vmtype;dumpdir=$dumpdir;hostname=$hostname;tarfile=$tarfile;logfile=$logfile\n";
    if ($phase eq 'backup-end' and defined ($tarfile) and defined ($hostname)) {
        if ( $tarfile=~/($basedir\/vzdump-(qemu|openvz)-\d+-)(\d\d\d\d_.+)/ ){
          my $tarfile2=$1.$hostname."-".$3;
          print "HOOK: Renaming file $tarfile to $tarfile2\n";
          move $tarfile, $tarfile2;
        }
    }
}

exit (0);


With this script you get a file name like vzdump-qemu-106-HOSTNAME-2012_06_22-14_35_59.tar.gz and this files are correctly listed by Proxmox interface. You can check the sample script /usr/share/doc/pve-manager/examples/vzdump-hook-script.pl to view all available states.

Configure the script in /etc/vzdump.conf

# vzdump default settings

#tmpdir: DIR
#dumpdir: DIR
#storage: STORAGE_ID
#mode: snapshot|suspend|stop
#bwlimit: KBPS
#ionice: PRI
#lockwait: MINUTES
#stopwait: MINUTES
#size: MB
#maxfiles: N
script: /root/scripts/vzdump-hook-script.pl
#exclude-path: PATHLIST

Now, every vzdump execution will call our script to rename the dump file name.
To finish you only have to apply this changes to all nodes in the Proxmox cluster.

vzdump: create KVM backups with an specific name

With Proxmox VE, the virtual environment I am using, you can configure KVM backups, but you are going to get dump files like this:

vzdump-qemu-117-YYYY_MM_DD-HH_MM_SS.tgz

The names of these files are not very representative and you should rename them if you want to easily identify your KVM backups in your storage.

I am using this command for KVM backups to get the files with their server names:

#
# vzdump --compress  --snapshot --storage pve-backups --maxfiles 2 --stdout 117 > /mnt/pve/pve-backups/myserver_YYYY_MM_DD.tgz
# 

You can put this command in a cron if you want.

To restore the machine simply run:

#
# qmrestore /mnt/pve/pve-backups/myserver_YYYY_MM_DD.tgz 117
#

VLAN tagging on Linux for KVM

Today, I’m going to explain my config for KVM server to get network connectivity on guests machines using tagged vlans to get independent networks. As virtual platform I am using Proxmox ve. Proxmox is a great platform to administer KVM and OpenVZ machines, actually it is based on Debian Lenny, but very soon will be available the 2.0 version based on Debian Squeeze and with many great features.

I have connected my kvm server network interfaces to two different switches and the switch ports configured in trunk mode only accepting traffic for my tagged vlans. For vlan configuration I am using vlan package in debian, rather than specify them like eth0.X, I prefer to configure them using this tool.

To install vlan package simply run:

 # apt-get install vlan

Above the two network interfaces I have configured a bond interface in active-backup mode. My /etc/network/interfaces file looks like this:

iface eth0 inet manual
iface eth1 inet manual


auto bond0
iface bond0 inet manual
        slaves eth0 eth1
        bond_miimon 100
        bond_mode active-backup

auto vlan50
iface vlan50 inet manual
        vlan_raw_device bond0

auto vlan60
iface vlan60 inet manual
       vlan_raw_device bond0

auto vlan100
iface vlan100 inet manual
       vlan_raw_device bond0


auto vmbr0
iface vmbr0 inet static
        address  172.17.16.5
        netmask  255.255.240.0
        gateway  172.17.16.1
        bridge_ports vlan100
        bridge_stp off
        bridge_fd 0

auto vmbr50
iface vmbr50 inet static
        address 0.0.0.0
        netmask 255.255.255.255
        bridge_ports vlan50
        bridge_stp off
        bridge_fd 0

auto vmbr60
iface vmbr60 inet static
        address 0.0.0.0
        netmask 255.255.255.255
        bridge_ports vlan60
        bridge_stp off
        bridge_fd 0


I have three bridges configured, vmbr0 (with vlan 100), required to access proxmox web interface, and vmbr50 and vmbr60, each of them accessing to their vlans to provide access to guests. The bridge vmbr0 is the only bridge that has an IP address configured, because is the only interface I’m going to use to access to the kvm server.

Now, it is easy to provide network connectivity to the kvm guests machines, simply you have to link their network interfaces to the bridge you want depending on, to that vlan you want they get access.

For example, part of one of my kvm machine config file looks like this:


vlan60: virtio=DE:17:7C:C3:CE:B2
vlan50: virtio=B2:0A:19:3E:72:4D

This is automatically added using proxmox ve web interface.

How to resize KVM virtual machine disk file


In KVM when you create a new virtual machine,  you have to specify the initial size of the disk that the machine is going to use. If later, you realize that initial size is not enough,  you can resize disk image with qemu-img command:

$ qemu-img resize vm-101-disk-1.raw +10G

In the example we have resized the disk image with 10Gb more. The new size can be specified in K for kilobyte, M for megabyte and G for gigabyte.

Inside virtual machine you are going to see new unassigned free space in the disk. If we have partitioned the guest machine with LVM we can easily extend the logical volumes  with the new space we have newly created in the disk. To do that we only have to create a new LVM partition and assign the new partition to the existing volume group.


Notice: Undefined variable: wp_sh_class_name in /var/www/elkano.org/blog/wp-content/plugins/wp-syntaxhighlighter/wp-syntaxhighlighter.php on line 1002

Notice: Undefined variable: wp_sh_class_name in /var/www/elkano.org/blog/wp-content/plugins/wp-syntaxhighlighter/wp-syntaxhighlighter.php on line 1002

Warning: Use of undefined constant XML - assumed 'XML' (this will throw an Error in a future version of PHP) in /var/www/elkano.org/blog/wp-content/plugins/wp-syntaxhighlighter/wp-syntaxhighlighter.php on line 1048